I was trying to add a "Table of Contents" Webpart to one of my SharePoint page during customization. But i couldn't find it in the web part gallery. I remember i used this webpart in one of my previous project with out any specific steps.
I tried different things to get the webpart in a trial and error manner. At last i was able to get this webpart after activating the "Publishing features".
In my previous project i activated the "Publishing features" for some other purpose, which also added the TOC webpart. So, when i tried to add the TOC webpart it was available right there. I didn't realise it is part of "Publishing features".
Tuesday, December 23, 2008
Wednesday, December 17, 2008
Persistence in SharePoint workflow
While creating the long running windows workflows it is mandatory to persist the workflow state at some point of time.

- to release the memory taken by workflow for execution
- to restore its state during the hardware failure
- to maintain the scalability of system
So, it is best practice to implement SqlWorkflowPersistenceService and using that we can persist the data in SQL database. This is the out of the box class provided by Microsoft for using SQL db as data store. But if we are going to use different data store we need to create our own persistence service class by inheriting the WorkflowPersistenceService class. Here is a good example given in this blog(http://www.devx.com/dotnet/Article/32247/0) to implement persistence using SqlWorkflowPersistenceService
Well , but what is happening in SharePoint workflows is entirely different process. We will not be having access to the workflow host application like windows workflows. Here SharePoint is hosting the workflow and the persistence service is implemented in it using SqlWorkflowPersistenceService. So, when a SharePoint workflow's controls goes in to some event based activities like "OnTaskChanged" or "OnTaskDeleted" activity, the workflow's state is dehydrated or persisted automatically in to the ContentDB of the particular SharePoint web application.
We can't implement our own persistence logic here because it should be written in the workflow host application rather than the workflow application. While developing SharePoint workflows we will not be having our own separate workflow host application because SharePoint is actually the host and controls the workflow execution. It is still using the workflow runtime to execute the workflows. But it is customized lot to support MOSS with lot of additional features. Persistence is one among those features.
Persistence in MOSS is implemented by SPWinOePersistenceService which is actually inherited from SqlWorkflowPersistenceService. It stores the workflow state in the Workflow table of the ContentDB.

The following picture shows that the workflow's instance state are actually stored in the "Instancedatasize" column of the table.

Once the workflow is completed the instance data is actually released from the database.

Friday, November 28, 2008
Workflows general debugging issues
VisualStudio crashes while attaching the w3wp.exe process.
While trying to attach the w3wp.exe process related to workflow, visual studio will take more time during the attach process then it will crash and reopen because of some issues. I am not sure yet why the visual studio is crashing with out giving any error. But i was able to resolve the problem by selecting only the "WorkflowCode" option from the "Attach To" select button.
There are more than one w3wp.exe. which one i should use?
The other issue generally we face is there will be more than on w3wp.exe processes will be showing and it will be confusing which one we should choose. We need to select the process which is showing "Workflow" in the Type section. If none of the processes are displaying "Workflow" in the Type section then it means that the appropriate process is not running. We can't debug by attaching to other w3wp.exe processes.
Couldn't find the process to attach the worflow.
The correct w3wp.exe process to attach the workflow will be showing "Workflow" in the Type column. But some times this will not be displaying due to various reasons. If we want to get the process again in the Attach window , We need to start a workflow manually. Then, the process related to the workflow will be available.
BreakPoints specified in the code file will not work (will not be hit during debug mode).
After specifying the break points in the code, the break points will not be enabled to debug and it will be showing the error "No symbols have been loaded for this document". The issue will be happening because of the following general mistakes.
There is one more issue happening while attaching the process. The break points will be still showing like they will not be hit. (with the "No symbols have been loaded for this document". warning). But if we start debugging after attaching the process with the above error, this error will disappear once the workflow started running and our break points will be hit.
While trying to attach the w3wp.exe process related to workflow, visual studio will take more time during the attach process then it will crash and reopen because of some issues. I am not sure yet why the visual studio is crashing with out giving any error. But i was able to resolve the problem by selecting only the "WorkflowCode" option from the "Attach To" select button.
There are more than one w3wp.exe. which one i should use?
The other issue generally we face is there will be more than on w3wp.exe processes will be showing and it will be confusing which one we should choose. We need to select the process which is showing "Workflow" in the Type section. If none of the processes are displaying "Workflow" in the Type section then it means that the appropriate process is not running. We can't debug by attaching to other w3wp.exe processes.
Couldn't find the process to attach the worflow.
The correct w3wp.exe process to attach the workflow will be showing "Workflow" in the Type column. But some times this will not be displaying due to various reasons. If we want to get the process again in the Attach window , We need to start a workflow manually. Then, the process related to the workflow will be available.
BreakPoints specified in the code file will not work (will not be hit during debug mode).
After specifying the break points in the code, the break points will not be enabled to debug and it will be showing the error "No symbols have been loaded for this document". The issue will be happening because of the following general mistakes.
- Correct version of the DLL is not deployed to GAC
- Correct version of the file is not specified in the config files like workflow.xml
- The Project is build again after the deploying the DLL to GAC
- There are some modifications done in the code file after the deployment
There is one more issue happening while attaching the process. The break points will be still showing like they will not be hit. (with the "No symbols have been loaded for this document". warning). But if we start debugging after attaching the process with the above error, this error will disappear once the workflow started running and our break points will be hit.
Failed on start - workflow error
I was trying to create a basic workflow with one single "LogtoHistory" activity. But when i tried to start that workflow after associating it with a List. It was failing with the error message "Failed on start"
I tried to debug it after attaching it with the w3wp.exe process. But it was not hitting the break points and the break points were saying the error message
"No symbols have been loaded for this document."
This gave me a clue about the error. I checked the assembly information in the workflow.xml file and found that schema i used to create the workflow.xml put the version of the assembly as 3.0.0.0 . I changed it to correct version and executed the workflow again. It worked fine.
So, If the workflow is failing with "Failed on start" it means there is some mismatch in the assembly information. But if the workflow is giving the error "Failed on Start (Retrying)" there may be some other issues.
This form cannot be opened. It is not workflow enabled
I was creating one workflow with simple Association and Task InfoPath forms. Then deployed the workflow as Feature with all the required InfoPath forms with proper workflow.xml settings.
But whenever i tried to associate the workflow with a custom list. The InfoPath form specified for association opened with the following error message as a pop up.
"This form cannot be opened. It is not workflow enabled"
Then it displayed the "The form is closed" message in the screen.
I checked all kind of settings available in the InfoPath form template and couldn't find any settings related to workflows. I also checked the browser compatibility settings, form ids and even the connection libraries used. But nothing worked out...
Finally i was able to fix the problem only by ..
- Create a new copy of InfoPath forms from the form templates.
- Deleted the existing form templates.
- Renamed the newly created copies of the template to earlier name.
- Deleted all the published versions of the form
- Re-published the forms to a new locations with new form Ids
- Pasted the newly published form in the feature folder
- Changed the form Ids in the workflow.xml
Type 'Microsoft.SharePoint.SPListItem' is not marked as serializable."
I was creating one SharePoint sequential workflow which will create a task and will be in "InProgress" status until the task is completed. But while changing the task i was seeing a weired behaviour of the workflow. It completed automatically with "Completed" status even though the task is not marked as completed. It also logged an error in the workflow history list which was not actually gave me any clue to proceed further. Following was the error message..
"Type 'Microsoft.SharePoint.SPListItem' in Assembly 'Microsoft.SharePoint, Version=12.0.0.0, Culture=neutral, PublicKeyToken=71e9bce111e9429c' is not marked as serializable."
After checking the code inside the "OnTaskChanged" activity. I tried the following code change.
Commented the below explicit variable declaration
//private SPListItem taskValue;
Changed the below line from
taskValue = workflowProperties.Web.Lists["Tasks"].GetItemById(onTaskChanged1_AfterProperties1.TaskItemId);
To
SPListItem taskValue = workflowProperties.Web.Lists["Tasks"].GetItemById(onTaskChanged1_AfterProperties1.TaskItemId);
It resolved my problem. But don't know yet what the above error is meant to be. I think i am missing some basic understanding here. Still working on it :)
How to find whether a operating system is 32 bit or 64 bit
I had to install one hotfix from microsoft, while downloading i was given different options to downlaod the correct package related to my Operation System. I was using the windows server 2003 operating system.
To find the information in windows server 2003,
To find the information in windows server 2003,
- Click on the MyComputer --->Properties --> General Tab.
- If the System Name is specified as "Microsoft Windows Server 2003 Enterprise Edition" then it is 32 bit OS.
- If the System Name is specified as "Microsoft Windows Server 2003 Enterprise x64 Edition" then its 64 bit OS.
Update: I found that there is also a very good article available from Microsoft to find the information for other OS as well. (http://support.microsoft.com/kb/827218)
Friday, October 31, 2008
SharePoint designer hangs while opening the default.aspx
This happened to me many times while trying to open the site in the SharPoint Designer. I was just opening the site using the File--> OpenSite option. It opened the site and displayed the Folder List. However while trying to open the default.aspx, it was not opening it. It was showing the message "Retrieving default.aspx" in status bar, then the message disappears and nothing else happened.
I even tried reinstalling SharePoint Designer. It didn't resolve the problem. However i was able to resolve my problem after registering it.
Everytime while opening site, It used to show me one dialog box to register the product. Somehow i was skipping that step manytimes eventhough our company provides us proper registration key. So, while opening the sharepoint site next time i gave the registration key properly in the dialog box. Now its opening the sites and rendering it properly.
I am not very clear about the funda behind it. But clearly this step resolved my problem.
Thursday, October 30, 2008
w700i Internet settings
I am using internet extensively in my mobile w700i (its outdated now :)) mostly during the 15hrs Bus travel to my native. However the issue i faced was, i was able to use internet only in the default mobile browser. If i tried to connect internet using other mobile browsers like Opera i was always getting "connection failed" error. The same problem happened with other Java based mobile applications using internet.
I asked my friends and i coudn't find the solution, So i was adjusting with the limited features of the default browser comes with my mobile. Last week i got some time to find the solution and finally found that a simple settings change will resolve this!!!!!!
1.Go to Settings-->Connectivity-->Internet Settings-->Internet Profiles
2.Select the profile received from your service provider.
3.Go to Settings-->Connectivity-->Internet Settings-->Settings for Java [this is important. many people will not see this settings(i am one among those)]
4.Select the profile received from your service provider.
If we have a single profile there is no problem because it will be selected by default. But if we have some other profiles for MMS and other things, we need to select the appropriate profile settings.
Update: Adding new menu item in SharePoint edit context menu
I made a blog post about adding a new menu item in SharePoint context menu. I was able to do that easily by deploying the menu item as feature. It is working fine.. However in many cases we may require the menu item only in the particular list and not in all the lists created under the site/site collection.
In that case if you deploy the menu as feature, it will be activated in site/site collection level. So the new menu item will be appearing in all the lists created under the scope specified in the feature.
If we need the menu item only in the particular list. It seems its still easy.. it can be achieved easily, if we follow the steps mentioned in the Shailaja's blog
http://shailajakumar.blogspot.com/2008/01/create-custom-context-menu-in.html
If it is not possible to add a content editor. We can still add our javascript function in a separate javascript file and link it in the master page.
Thursday, October 16, 2008
Creating tasks inside a while activity of workflow
In many of the workflow based projects, one of the important workflow functionality used is "tasks creation". Many times these tasks will be created repeatedly for every process completed by the workflow.


In these kind of scenarios we may require the task creation inside a loop, using "while activity" or the "replicator activity". But if you would like to use the "Create Task" activity inside the "while activtiy", make sure you are doing the following settings correctly otherwise workflow will create the task first time but it will give the error in the subsequent loops.
1. Keep all the task related activities (mostly, "create task", "onTaskChanged" and "complete task") inside a Sequential activity.
2. Use a separate correlation token for the activities inside the "Sequential activity"
3. For all the activities inside the "Sequential activity", Change the Owner activity property value to the sequential activity(this is important)
Following picture shows a simple workflow which contains the "create task" activity inside a while loop. Note that all the task related activities are kept inside the "Sequential activity".

This picture shows the properties of "create task activity". Owner activity name and correlation tokens should be changed as shown in the picture. This needs to be done for all the task related activities inside the "Sequential activity"

Tuesday, October 7, 2008
Create feature.xml for workflows using Code Snippet feature
While creating feature.xml or other XMLs from scratch, many people will be feeling a kind of difficulty. Well, this may not be applicable for people who live with visualstudio :). However while starting from scratch i noticed many of the developers are looking for a copy of feature.xml in features folder or somewhere else.
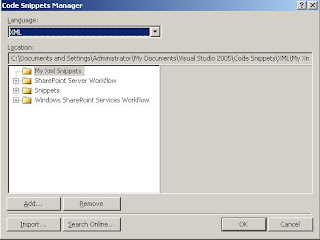
There is a very easy way to get your code snippet using visualstudio Code Snippet Manager.
1.Open your project in Visualstudio and add a new xml file
2.Press Ctrl K, Ctrl B. It should open Code Snippets Manager. We can also open this from Tools--> Code Snippets Manager menu.
3.Select XML from the Language drop down. Click on the Add button.
4.Select "C:\Program Files\Microsoft Visual Studio 8\Xml\1033\Snippets\Windows SharePoint Services Workflow" folder and "C:\Program Files\Microsoft Visual Studio 8\Xml\1033\Snippets\SharePoint Server Workflow"
Note: The second one is bit descriptive and it will come up with tags related to InfoPath forms and details about receiver class and assembly.
5.Right click in editor and select "Insert Snippet" from the context menu.
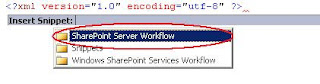
6.Select the feature.xml snippet. It will give us the Feature.xml we just need to fill up the template.
There is a very easy way to get your code snippet using visualstudio Code Snippet Manager.
1.Open your project in Visualstudio and add a new xml file
2.Press Ctrl K, Ctrl B. It should open Code Snippets Manager. We can also open this from Tools--> Code Snippets Manager menu.
3.Select XML from the Language drop down. Click on the Add button.
4.Select "C:\Program Files\Microsoft Visual Studio 8\Xml\1033\Snippets\Windows SharePoint Services Workflow" folder and "C:\Program Files\Microsoft Visual Studio 8\Xml\1033\Snippets\SharePoint Server Workflow"
Note: The second one is bit descriptive and it will come up with tags related to InfoPath forms and details about receiver class and assembly.

5.Right click in editor and select "Insert Snippet" from the context menu.

6.Select the feature.xml snippet. It will give us the Feature.xml we just need to fill up the template.
Friday, October 3, 2008
XML intellisense support for feature.xml file
This might be a well known point for developers who are already familiar in visual studio development environment. I am just putting this point for the beginners.
This is not specific to feature.xml file. We can use the same technique to get the intellisense support for other XML format files, the point is we need to select the appropriate schema files.
For feature.xml we need to do the following steps to get the intellisense support.
1.Add a blank XML file to your existing visual studio project and save it as feature.xml.
2.Select the properties of the feature.xml file.(F4) and click on the "schemas" property. a dialog box should open.
3.Click on the Add button.
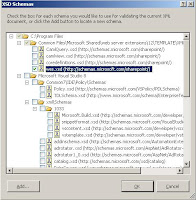
4.Select the wss.xsd file from the Share Point schema location "C:\Program Files\Common Files\Microsoft Shared\web server extensions\12\TEMPLATE\XML\wss.xsd"
5. Make sure the wss.xsd is selected in the "XSD Schema" window. Click on OK.
Now you should be able to use the Intellisense support for feature.xml file and other WSS related XML files
This is not specific to feature.xml file. We can use the same technique to get the intellisense support for other XML format files, the point is we need to select the appropriate schema files.
For feature.xml we need to do the following steps to get the intellisense support.
1.Add a blank XML file to your existing visual studio project and save it as feature.xml.
2.Select the properties of the feature.xml file.(F4) and click on the "schemas" property. a dialog box should open.
3.Click on the Add button.
4.Select the wss.xsd file from the Share Point schema location "C:\Program Files\Common Files\Microsoft Shared\web server extensions\12\TEMPLATE\XML\wss.xsd"
5. Make sure the wss.xsd is selected in the "XSD Schema" window. Click on OK.

Now you should be able to use the Intellisense support for feature.xml file and other WSS related XML files
Monday, September 29, 2008
How to see workflow log history
While creating the workflows, one of the activity used frequently is log workflow history activity. This will log the information into the workflow history list. This is one of the feasible option for tracing the workflow process or activities. If the workflow process is bit lengthy with lot of branches this is going to help you lot.
But how to see the log history, If you click the workflow status column (for eg:"completed"). It will just show only the latest log history of the workflow instance executed and tied to that particular item. We need to check separately for other items.
Many times We will be requiring the entire workflow history to troubleshoot if any problems during the issues. This stored in a list called "workflow History". But if you check the "view all site content option" of your site you can't see the workflow history list. It is because the workflow history list is hidden and it will not be visible in the "view all site content option".
Still we can see this list by directly typing the URL. The below URL is showing the workflow history list of my site,
http://abcdomain:6666/sites/abcsite/Lists/workflow%20history/AllItems.aspx
Adding link in List Item context menu
Many times during the customization of WSS sites, we will be getting requirements to add different links in the context menu[Edit control block] of list items. There are different ways to do that. However adding this menu item as a feature is really looking cool, following simple feature will make this understand better.
1. Go to C:\Program Files\Common Files\Microsoft Shared\web server extensions\12\TEMPLATE\FEATURES folder and create an new feature folder called "AddCommunication"
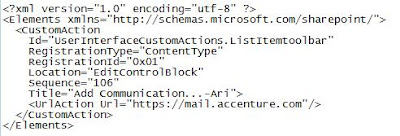
2. Save the following code as feature.xml (update the GUID using GUID generator) into"AddCommunication" folder
1. Go to C:\Program Files\Common Files\Microsoft Shared\web server extensions\12\TEMPLATE\FEATURES folder and create an new feature folder called "AddCommunication"
2. Save the following code as feature.xml (update the GUID using GUID generator) into"AddCommunication" folder


4. Install the feature.
stsadm -o installfeature -filename AddCommunication\feature.xml
5. Activate the feature
stsadm -o activatefeature -filename AddCommunication\feature.xml -url http://mysharepointsitecollection/
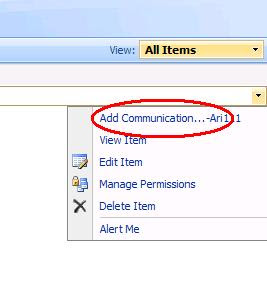
6. Go to your site and check the list item context menu drop down. This should look like the below image
stsadm -o installfeature -filename AddCommunication\feature.xml
5. Activate the feature
stsadm -o activatefeature -filename AddCommunication\feature.xml -url http://mysharepointsitecollection/
6. Go to your site and check the list item context menu drop down. This should look like the below image

This can be also done by using Java script easily, but for me feature is looking more convenient. I found a good article explaining this in Java script way
http://sizzlingpassion.spaces.live.com/blog/cns!E5CD42098EED7323!266.entry
Apart from the edit item context menu, this kind of links can be added in many menu types available in a WSS site. We need to select the correct group id of the document library or list library. A good microsoft step by step tutorial is available to understand this better.
http://msdn.microsoft.com/en-us/library/ms473643.aspx
Friday, September 19, 2008
Workflows saved with template are not working
we were working on a site customization requirement which involved creation of SharePoint workflows using SharePoint designer. These workflows and the other site customization were saved as the site template. Client will be using this template to create number of sharepoint sites based on his business requirement.
During the testing phase, we found few of the workflows saved with template didn't work and gave the "Failed on start(retrying)" error messsage on the sites created using the root site template. However the workflows were working fine in the root site.
We did lot of research and came to the follwoing conclusion. This issue is not happeing only to my project, its happening even if you try to do this steps in a vennila SharePoint site created based on team site template .
Conclusion
1.In the rootsite, if you did any kind of modification in the workflow (ie; open the workflow in the SharePoint designer, do some changes and save it again) these workflows will not work in the sites created based on the root site template.
2. However if you didn't do any modification in the workflow after its first tiem save. Then the workflow will be working fine in the sites created based on the root site template.
Workarounds
1. If you would like to do some modification in the workflows after it saved successfully first time, just delete it from the sharePOint designer and recreate it again. Don't do any modification and save it again.
2. If you would like to resolve the issue without modifying the root site template, you need to open the problematic workflows in Sharepoint designer and just click the "finish" button in the wizard. This will resolve the issue and the workflow will be working fine for all the upcoming items in the list.
3. If your project schedule and processes allowed for changing the structure of the SharePoint workflow, just recreate it in visual studio and deploy it as a site collection feature. This will resolve all the deployment related issue
Deploying the workflows with templates is not suggested by many of the Microsoft MVPs. However its working fine for me now and i m not going for any other modifications because whatever method you follow at the end of the day the client should be happy :) its happening for me so no worries...:D
Hiding the Leftnavigator of SharePoint site Using JavaScript
I found in manycases of SharePoint site customization, people usually don't like the default leftnavigator option in the home page. They want to display some other customized leftnavigator or just want to have the page with out leftnavigator. This can be done easily by creating a masterpage with out leftnavigator, but if you would like to display it based on the pages/sites, for example leftnavigator is not required in homepage but its required in some other pages and in some subsites. In many of these kind of scenarios the following script and the content editor webpart are helping me lot...
1.Open the master page in SharePoint designer and the find out the Table Tag responsible for displaying the entire leftnavigator contents.
2.Just give a ID for the Tag, It should look something similar to the below tag(without the "_" in HTML tags. [make sure you are taking backup of the existing master page]
<_TABLE height="100%" id ="leftNavigatorTable" class=ms-navframe CELLPADDING=0 CELLSPACING=0 border="0">
3.Publish and approve the masterpage.
4.Open the page where you want to hide the leftnavigator.
5.Add a content editor webpart and add the following script(modify the script tag). This will hide the leftnavigator.
<_script>
document.getElementById('leftNavigatorTable').style.visibility = "hidden";
document.getElementById('leftNavigatorTable').style.display = "none";
6.If you don't want to use contenteditor webpart you can just call the following javascript function in the onload function of the BODY tag in the master page. This will hide the leftnavigator only in default.aspx
function HideLeftNavigator()
{
var url;
url = window.location.toString().split('/');
document.getElementById('leftNavigatorTable').style.visibility = "hidden";
document.getElementById('leftNavigatorTable').style.display = "none";
var length = url.length;
if(url[length-1].toLowerCase() != "default.aspx")
{
document.getElementById('leftNavigatorTable').style.visibility = "visible";
document.getElementById('leftNavigatorTable').style.display = "inline";
}
}
Happy Learning!!!!!!!
Using JavaScript in Content Editor webpart
Adding the script in a ContentEditor webpart is very staraightforward and easy too. For example if we want to execute a script while loading the page, we just need to add a content editor webpart in the page and add the script in the Source editor of the content editor webpart. For example to give a simple alert message while loading the page, the follwoing steps are suffient.
1.Open the page in edit mode.
2.Add a content editor webpart and click on "Modify shared webpart" option.
3.Click on the sourceEditor button and paste the following simple code(with correct script tag) in the editor window. Click on Save button
<_script type="text/javascript" language="javascript">
var url;
url = window.location.toString()
alert("Location: "+ url);
4.Check the "Hidden" check box under the "Layout" section.[This will not show the contenteditor webpart in the page, because we using it just for javascript sake]
5.Click on the "Ok" button and press exit edit mode link.
6.This should display the popup box mentioning the URL of the page.
Calling a javascript function while loading default.aspx
There are different techniques available to call a javascript function in a sharepoint page. Following is one of the feasible solution. The idea is to include the external javascript file reference in the master page of the site and include it in the onload event of the BODY tag. Just follow the below simple steps to do this - may be only for beginners ;).
1.Create a Javascript file named myScript.js.
2.Add a simple javascript function like this.
function myFunction()
{
alert("alert from myFunction.");
}
3.Place the file into C:\Program Files\Common Files\Microsoft Shared\web server extensions\12\TEMPLATE\LAYOUTS folder.
4.Open the site where you need to call the function.
5.Activate the "Office SharePoint Server Publishing" feature to enable selecting masterpage. By going to "SiteSettings-->Site features" option under the "Site Administration" section. Click on the "Activate" button besides the "Office SharePoint Server Publishing" feature.
[if you get the error "One or more features must be turned on before this feature can be activated." you need to activate the "Office SharePoint Server Publishing Infrastructure" in site collection level]
6.Go to site settings and click on the "Master pages and page layouts" link under the Galleries section.
7.Select default.aspx and click on the "Edit in Microsoft SharePoint Designer" link from the context menu.
8.Click on File-->SaveUs from SharePoint Designer and save the default.master as TestJavaScript.master
9.Do some changes to differentiate this file from default.master (eg: removing the welcome links or applying different .css classes)
10.Find the body tag of the master page, it should look something similar to (i am including the "_" with the HTML tags to avoid the blogger interpreting it as HTML)
<_body scroll="yes" onload="javascript:if (typeof(_spBodyOnLoadWrapper) != 'undefined') _spBodyOnLoadWrapper();">
11.Add a reference to our new javascript file just above the BODY tag.
<_script type="text/javascript" src="_layouts/myScript.js"> <_script>
12.Now...just add our function name to the onload event like this and save the file.
<_body scroll="yes" onload="javascript:if (typeof(_spBodyOnLoadWrapper) != 'undefined') _spBodyOnLoadWrapper();myFunction();">
13.Right click the "TestJavaScript1.master" from the left navigator(Folder List) and click on "Check in". Choose the "Publish a major version" option and click Ok button.
14.Click on Yes in the approval dialog box. Master page gallery will open. Select the TestJavaScript file and click on Approve/reject from the context menu. Select "Approve" option and click on OK button.
15.Its almost done. Now we just need to select the "TestJavaScript.master". Go to "SiteSettings-->MasterPage" option under the "Look and Feel" section and select the "TestJavaScript.master" from Site MasterPage and SystemMasterPage sections.
16.Go to the homepage of the site you should be getting the popup message "alert from myFunction."
Adding a logo in a SharePoint Workflow email response
SharePoint designer's email body editor will have the ability to support the emails with HTML format. So if we want to display a logo in a email message we can just use a simple HTML image tag .
Also, makesure that the logo should be accessible anonymously by all the receivers of the email. If not, it will be prompting for the credentials once they open the email messages.
Also, makesure that the logo should be accessible anonymously by all the receivers of the email. If not, it will be prompting for the credentials once they open the email messages.
Saturday, August 30, 2008
Failed to extract the cab file in the solution error while deploying the .WSP file
I got a requirement to create a site definition from a site. I created a blank SharePoint site and applied all the customization required on top of the blank site,it involved mainly the SharePoint Designer customization, Master page changes and the customization related to List and document libraries.
Then i was using the SharePoint solution generator to create the soluction. It successfully created the solution and i was able to build the solution in Visual studio 2005. It didn't give any issue while creating the .wsp file too.
But the problem happened when i was trying to deploy the solution from visualStudio 2005 using the "Deploy solution" option. It failed and gave me an error Deploy failed: "Failed to extract the cab file in the solution"
I tried to add the solution using the stsadm.exe -o addsolution command but got the same result.
After some more investigation i found that the issue is becuase .wsp packages with the filenames containing special characters will give the mentioned error while adding the solution to the SharePoint solution store.
So, I verified my new site definition project files created by solution generator. As expected, it was because of a file i named it with special characters while customizing the site. I had named that file as Newform(backup).aspx that was the reason for the problem. I just renamed that file without special characters rebuilt the project again, then deployed the site definition using "deploy solution" option.
It worked fine.
Tuesday, August 26, 2008
Find SharePoint version number
I had to prepare a document mentioning the softwares installed in my development environment. I was able to find the version number of other softwares. But in sharepoint its not quite straight forward and need to follow the below steps to find the exact version number
1.Go to central admin
2.Click on the Operations tab
3.Click on "servers in form" option under Topology and Services section
4.It should display the list of servers available in that farm as well as the version number of MOSS installed on those servers.
1.Go to central admin
2.Click on the Operations tab
3.Click on "servers in form" option under Topology and Services section
4.It should display the list of servers available in that farm as well as the version number of MOSS installed on those servers.
Display site collection name in top navigation bar instead of the text "Home"
When we create a new site collection(team site), the top navigation bar of the site collection will show the "Home" text. Based on one of our requirement we need to display the site collection name instead of displaying "Home",similar to the subsites.
I was thinking like it may require share point desginer customization, but there is an easy way out...
we just need to activate the site collection feature "Office SharePoint Server Publishing Infrastructure". That is changing the "Home" text to the
name given in the "Title" field of the site collection.
Monday, August 25, 2008
MSDN Forum points
I was answering few posts in MSDN forums and wanted to see how the points recognition system works. But i couldn't see the points from the profile page (most of the people expect the points table here).
I tried few options available in the forum and found that the points can be seen by clicking the "Browse user" button.
So, if you have done some contribution in MSDN forums, just click the "Browse user" button. Type the user name in the search box and search. It will show the points.
To know about how the points are calculated..refer the below Microsoft link
http://forums.msdn.microsoft.com/en-US/help#310
Tuesday, August 12, 2008
Disabling MySite option or Restricting it for specific users
Based on our project design, there won't be any personalization features for the users. I was checking with the various options available in Central admin and Shared service provider, here is the settings for doing that.
We need the administrator login to do the below settings changes.
1. Login to the central admin
2. Select the appropriate Shared Service Provider from the Left navigator
3. Click on the "Personalization services permission" link under the "User Profiles and MySites" section
4. Select the Group Name which contains the users to be restricted for "MySite" option, most probably this should be NT AUTHORITY\Authenticated Users and click on "Modify Permissions of Selected Users"
5. UnCheck the "Create Personal Site" Option (For disabling MySite)
6. UnCheck the "User Personal features" Option (For disabling MyLinks)
7. Click on the Save Button.
If you would like to give the MySite option to specific users follow the below steps,
1. Make sure the users need "MySite" option are organized via a active directory group.
2. Select the "Personalization services permission" link under the "User Profiles and MySites" section.
3. Click on the Add Users/Groups
4. Give the active directory group Name
Note:We can also add User Names here but its not going to be scalable and will not be a good design.
Usually in a MOSS project the authorization part is done based on SharePoint Security groups, In most of the cases these groups will be mapped with an active directory account group.So we can easily select a share point security group to fit with this requirement and give that group's active directory mapping here.
5. Select the "Create Personal Site" Option (For disabling MySite)6. Select the "User Personal features" Option (For disabling MyLinks)
7. Click on the Save Button.
Wednesday, August 6, 2008
'HTTP/1.1 503 Service Unavailable' Issue while opening /creating ASP.NET Projects
I was trying to open a project which was included with an asp.net web service project in VS2005 but got the following error.
It was required to access some other sites needed for developing projects like msdn.microsoft. This needs to be done every time we connect to this network freshly. The same script needs to be configured for accessing http:\\localhost and for all the ASP.NET stuff.
So guys, if you face this problem any time further don't spend too much time on investigating it and just check your proxy settings immediately if it is perfect. Do check your Site authentication settings and the access rights of IWAM_[Machinename],IUSR_[Machinename] accounts. You can also try to register your ASP.NET using aspnet_regiis.exe

"The Web server reported the following error while attempting to create or open the Web project located at the
 following URL 'http://localhost/vijayservice', ''HTTP/1.1 503 Service Unavailable'
End up with the same error while trying create a new asp.net project too.
I checked the below things and it was perfect.
Default site authentication settings
User rights of user Ids IWAM_[Machinename],IUSR_[Machinename]
Somehow got the clue from the following things and resolved the problem as per the further points
Found that the same project was opening in my virtual PC.
My IIS was even not able to open the http:\\localhost There were new restrictions implemented about using internet in our company and based on that the network will block all the addresses if the URL don't have our company name. But it was not really possible in our development team and we got some special rights for using other sites, based on that a proxy script was given and configured in our IE as like below screenshot.

It was required to access some other sites needed for developing projects like msdn.microsoft. This needs to be done every time we connect to this network freshly. The same script needs to be configured for accessing http:\\localhost and for all the ASP.NET stuff.
So guys, if you face this problem any time further don't spend too much time on investigating it and just check your proxy settings immediately if it is perfect. Do check your Site authentication settings and the access rights of IWAM_[Machinename],IUSR_[Machinename] accounts. You can also try to register your ASP.NET using aspnet_regiis.exe
Monday, August 4, 2008
Enabling Clipboard sharing and Dynamic resizing in Virtual PC 2007
When i was using my SPS2003 installed virtual machine, I was able to share my clipboard contents between Virtual Machine and host machine. And I was able to resize the Virtual Machine by dragging its windows to a specific size and double clicking its bottom corner, by doing this i was able to fit the virtual machine screen to the window size adjusted by drag and drop.
But the above two options didn't work in the Virtual machine I got for MOSS. It was very inconvenient for me to work with out those options. i tried various things to set it correct..
I found that these functionalities are part of Virtual Machine additions and confirmed it is installed in my Virtual PC. Based on Virtual PC Guy's(Ben Armstrong) one of the
blog i got to know that "vmusrvc.exe" is the key component for these features. So to get the above two functionalities,i did the following..
checked the registry entries and found the following entries. If there are no Registry entries for Virtual Machine additions might not be installed on the Virtual Machine.
[HKEY_LOCAL_MACHINE\SOFTWARE\Microsoft\Windows\CurrentVersion\Run]
"VMUserServices"="C:\WINDOWS\VMADD\VMUSrvc.exe"
Also verified "VMUSrvc.exe" is available in the above location and confirmed it is running by task manager processes tab. but still i had no luck.
Finally i was able to do it by closing the VMUSrvc.exe from task manager processes and restarting it from the location "C:\WINDOWS\VMADD\VMUSrvc.exe". A simple workaround resolved my long lasting issue and made me happy:)
Saturday, August 2, 2008
To enable sound in Virtual PC 2007
I resolved this problem in my VirtualPC2007 by following the below steps. wdma_ctl.inf and ctlsb16.sys should resolve the problem. These files can be extracted from a Windows XP product CD.
Insert the XP CD in host OS, then using CD--> Use Physical Drive option to access the CD Drive inside VPC.
Create a folder named SoundBlaster16 in C: drive. Open the command prompt and give the following commands one by one after changing the CD drive appropriately. This will extract the required files to C:\SoundBlaster16
Choose "yes this time only option" and "Install from a list or specific location" option in the wizard.
Browse and select the C:\soundblaster16 folder created newly. Press Next ignore if any warning messages. This will install the required drivers. Click on finish once the installation is completed.
Go to start-->Settings-->control panel-->Sounds and Audio devices. Check the enable sound option. Restart the virtual machine.This will enable the audio. Check the "Place volume icon in the taskbar" option to get the sound icon in system tray.
This resolves the problem in most of the virtual PCs with windows2003 server, however it was asking the following list of files when i was configuring sound in my virtual PC. This might be because i haven’t installed SP2 yet.
[aec.sys,dmusic.sys,drmk.sys,drmkaud.sys,kmixer.sys,ks.sys,ksproxy.ax,ksuser.dll,portcls.sys,splitter.sys,swmidi.sy,sysaudio.sys,wdmaud.sys]
It was also asking few other files, i was able to select those from C:\windows\system32\ and c:\windows\system32\drivers folder of the Virtual PC itself.
These files also can be extracted from windows XP product CD using the following commands. Select these files from the SoundBlaster16 folder when the popup window asks for the file.
Insert the XP CD in host OS, then using CD--> Use Physical Drive option to access the CD Drive inside VPC.
Create a folder named SoundBlaster16 in C: drive. Open the command prompt and give the following commands one by one after changing the CD drive appropriately. This will extract the required files to C:\SoundBlaster16
        expand d:\I386\driver.cab -F:ctlsb16.sys c:\SoundBlaster16
        expand d:\I386\WDMA_ctl.IN_ C:\SoundBlaster16\wdma_ctl.inf
Start-->Run and type "Compmgmt.msc." Go to Device Manager and select the problematic soundblaster16 audio device. Right click and select the update driver option.Choose "yes this time only option" and "Install from a list or specific location" option in the wizard.
Browse and select the C:\soundblaster16 folder created newly. Press Next ignore if any warning messages. This will install the required drivers. Click on finish once the installation is completed.
Go to start-->Settings-->control panel-->Sounds and Audio devices. Check the enable sound option. Restart the virtual machine.This will enable the audio. Check the "Place volume icon in the taskbar" option to get the sound icon in system tray.
This resolves the problem in most of the virtual PCs with windows2003 server, however it was asking the following list of files when i was configuring sound in my virtual PC. This might be because i haven’t installed SP2 yet.
[aec.sys,dmusic.sys,drmk.sys,drmkaud.sys,kmixer.sys,ks.sys,ksproxy.ax,ksuser.dll,portcls.sys,splitter.sys,swmidi.sy,sysaudio.sys,wdmaud.sys]
It was also asking few other files, i was able to select those from C:\windows\system32\ and c:\windows\system32\drivers folder of the Virtual PC itself.
These files also can be extracted from windows XP product CD using the following commands. Select these files from the SoundBlaster16 folder when the popup window asks for the file.
        expand d:\I386\sp2.cab -F:ksuser.dll c:\SoundBlaster16
        expand d:\I386\sp2.cab -F:ksproxy.ax c:\SoundBlaster16
        expand d:\I386\sp2.cab -F:ks.sys c:\SoundBlaster16
        expand d:\I386\sp2.cab -F:drmk.sys c:\SoundBlaster16
        expand d:\I386\sp2.cab -F:portcls.sys c:\SoundBlaster16
        expand d:\i386\sp2.cab -F:WDMAUD.SYS C:\soundblaster16
        expand d:\i386\sp2.cab -F:sysaudio.SYS C:\soundblaster16
        expand d:\i386\sp2.cab -F:splitter.sys C:\soundblaster16
        expand d:\i386\sp2.cab -F:aec.sys C:\soundblaster16
        expand d:\i386\driver.cab -F:swmidi.sys C:\soundblaster16
        expand d:\i386\sp2.cab -F:dmusic.sys C:\soundblaster16
        expand d:\i386\sp2.cab -F:kmixer.sys C:\soundblaster16
expand d:\i386\sp2.cab -F:drmkaud.sys C:\soundblaster16Wednesday, July 30, 2008
Issues faced during the Retraction of wrongly deployed solution
I downloaded a project from internet to learn some of the object model stuff. It was included with the .wsp solution to directly deploy it to SharePoint site and test the code. I added the solution as a feature using the following command.
stsadm.exe -o addsolution -filename c:\TesttheCode.wsp
and successfully deployed it using the central admin-->operations-->solution management. Clicked on the Testthecode.wsp and selected the "Deploy Solution" option.
But after the deployment i found that it was not functioning as expected so i tried to remove it completely. But needed some time for that since i was facing some issues..
I tried to remove it by using the operations-->solutionmanagement link and clicking the "Retract solution" option. It failed with an error.
"The timer job for this operation has been created, but it will fail because theadministrative service for this server is not enabled. If the timer job is scheduled to run at a later time, you can run the jobs all at once using stsadm.exe -o execadmsvcjobs. To avoid this problem in the future, enable the Windows SharePoint Services administrative service, or run your operation through the STSADM.exe command line utility."
I tried to Retract it again using the "Retract solution" option second time but the issue was i couldn't find that "Retract solution" option itself. It was just showing one option "Back to solution" and a message "Error" for the TesttheCode.wsp solution
The timerjob status was showing "failed" in Operations-->Time Job status. i was checking various services in central admin Topology and services section. but later i found that, in windows services "Windows SharePoint Services Administration" service was disabled and it was running. so I enabled it using services.msc "start" option. But still in central admin i couldn't find the "Retract solution" option. So i tried the following command and it worked
stsadm.exe -o retractsolution -name testthecode.wsp -immediate -url "http://mydevelopmentapp20:8000/"
It executed successfully with the following message.
"Timer job successfully created."
Then i was able to remove it completely by solution management-->Remove solution option.
But i was able to do various central admin tasks with out enabling this service. i am just trying to find out what exactly this service is offering....
Saturday, July 26, 2008
About Me
Hi all, I am living in Bangalore, India. I am working for a company as software engineer, there I develop and enhance the applications mostly based on Microsoft .NET framework, SPS2003 and MOSS2007. Currently I am working with MOSS 2007.I am planning to post my experience about resolving the issues i face during development and also about the new things I learnt. Lets see how it goes..
Subscribe to:
Posts (Atom)

_526_525.jpg)
