While creating the workflows, one of the activity used frequently is log workflow history activity. This will log the information into the workflow history list. This is one of the feasible option for tracing the workflow process or activities. If the workflow process is bit lengthy with lot of branches this is going to help you lot.
But how to see the log history, If you click the workflow status column (for eg:"completed"). It will just show only the latest log history of the workflow instance executed and tied to that particular item. We need to check separately for other items.
Many times We will be requiring the entire workflow history to troubleshoot if any problems during the issues. This stored in a list called "workflow History". But if you check the "view all site content option" of your site you can't see the workflow history list. It is because the workflow history list is hidden and it will not be visible in the "view all site content option".
Still we can see this list by directly typing the URL. The below URL is showing the workflow history list of my site,
http://abcdomain:6666/sites/abcsite/Lists/workflow%20history/AllItems.aspx
Monday, September 29, 2008
Adding link in List Item context menu
Many times during the customization of WSS sites, we will be getting requirements to add different links in the context menu[Edit control block] of list items. There are different ways to do that. However adding this menu item as a feature is really looking cool, following simple feature will make this understand better.
1. Go to C:\Program Files\Common Files\Microsoft Shared\web server extensions\12\TEMPLATE\FEATURES folder and create an new feature folder called "AddCommunication"
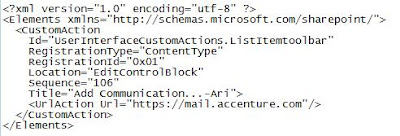
2. Save the following code as feature.xml (update the GUID using GUID generator) into"AddCommunication" folder
1. Go to C:\Program Files\Common Files\Microsoft Shared\web server extensions\12\TEMPLATE\FEATURES folder and create an new feature folder called "AddCommunication"
2. Save the following code as feature.xml (update the GUID using GUID generator) into"AddCommunication" folder


4. Install the feature.
stsadm -o installfeature -filename AddCommunication\feature.xml
5. Activate the feature
stsadm -o activatefeature -filename AddCommunication\feature.xml -url http://mysharepointsitecollection/
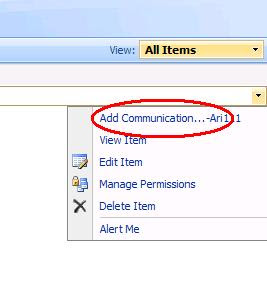
6. Go to your site and check the list item context menu drop down. This should look like the below image
stsadm -o installfeature -filename AddCommunication\feature.xml
5. Activate the feature
stsadm -o activatefeature -filename AddCommunication\feature.xml -url http://mysharepointsitecollection/
6. Go to your site and check the list item context menu drop down. This should look like the below image

This can be also done by using Java script easily, but for me feature is looking more convenient. I found a good article explaining this in Java script way
http://sizzlingpassion.spaces.live.com/blog/cns!E5CD42098EED7323!266.entry
Apart from the edit item context menu, this kind of links can be added in many menu types available in a WSS site. We need to select the correct group id of the document library or list library. A good microsoft step by step tutorial is available to understand this better.
http://msdn.microsoft.com/en-us/library/ms473643.aspx
Friday, September 19, 2008
Workflows saved with template are not working
we were working on a site customization requirement which involved creation of SharePoint workflows using SharePoint designer. These workflows and the other site customization were saved as the site template. Client will be using this template to create number of sharepoint sites based on his business requirement.
During the testing phase, we found few of the workflows saved with template didn't work and gave the "Failed on start(retrying)" error messsage on the sites created using the root site template. However the workflows were working fine in the root site.
We did lot of research and came to the follwoing conclusion. This issue is not happeing only to my project, its happening even if you try to do this steps in a vennila SharePoint site created based on team site template .
Conclusion
1.In the rootsite, if you did any kind of modification in the workflow (ie; open the workflow in the SharePoint designer, do some changes and save it again) these workflows will not work in the sites created based on the root site template.
2. However if you didn't do any modification in the workflow after its first tiem save. Then the workflow will be working fine in the sites created based on the root site template.
Workarounds
1. If you would like to do some modification in the workflows after it saved successfully first time, just delete it from the sharePOint designer and recreate it again. Don't do any modification and save it again.
2. If you would like to resolve the issue without modifying the root site template, you need to open the problematic workflows in Sharepoint designer and just click the "finish" button in the wizard. This will resolve the issue and the workflow will be working fine for all the upcoming items in the list.
3. If your project schedule and processes allowed for changing the structure of the SharePoint workflow, just recreate it in visual studio and deploy it as a site collection feature. This will resolve all the deployment related issue
Deploying the workflows with templates is not suggested by many of the Microsoft MVPs. However its working fine for me now and i m not going for any other modifications because whatever method you follow at the end of the day the client should be happy :) its happening for me so no worries...:D
Hiding the Leftnavigator of SharePoint site Using JavaScript
I found in manycases of SharePoint site customization, people usually don't like the default leftnavigator option in the home page. They want to display some other customized leftnavigator or just want to have the page with out leftnavigator. This can be done easily by creating a masterpage with out leftnavigator, but if you would like to display it based on the pages/sites, for example leftnavigator is not required in homepage but its required in some other pages and in some subsites. In many of these kind of scenarios the following script and the content editor webpart are helping me lot...
1.Open the master page in SharePoint designer and the find out the Table Tag responsible for displaying the entire leftnavigator contents.
2.Just give a ID for the Tag, It should look something similar to the below tag(without the "_" in HTML tags. [make sure you are taking backup of the existing master page]
<_TABLE height="100%" id ="leftNavigatorTable" class=ms-navframe CELLPADDING=0 CELLSPACING=0 border="0">
3.Publish and approve the masterpage.
4.Open the page where you want to hide the leftnavigator.
5.Add a content editor webpart and add the following script(modify the script tag). This will hide the leftnavigator.
<_script>
document.getElementById('leftNavigatorTable').style.visibility = "hidden";
document.getElementById('leftNavigatorTable').style.display = "none";
6.If you don't want to use contenteditor webpart you can just call the following javascript function in the onload function of the BODY tag in the master page. This will hide the leftnavigator only in default.aspx
function HideLeftNavigator()
{
var url;
url = window.location.toString().split('/');
document.getElementById('leftNavigatorTable').style.visibility = "hidden";
document.getElementById('leftNavigatorTable').style.display = "none";
var length = url.length;
if(url[length-1].toLowerCase() != "default.aspx")
{
document.getElementById('leftNavigatorTable').style.visibility = "visible";
document.getElementById('leftNavigatorTable').style.display = "inline";
}
}
Happy Learning!!!!!!!
Using JavaScript in Content Editor webpart
Adding the script in a ContentEditor webpart is very staraightforward and easy too. For example if we want to execute a script while loading the page, we just need to add a content editor webpart in the page and add the script in the Source editor of the content editor webpart. For example to give a simple alert message while loading the page, the follwoing steps are suffient.
1.Open the page in edit mode.
2.Add a content editor webpart and click on "Modify shared webpart" option.
3.Click on the sourceEditor button and paste the following simple code(with correct script tag) in the editor window. Click on Save button
<_script type="text/javascript" language="javascript">
var url;
url = window.location.toString()
alert("Location: "+ url);
4.Check the "Hidden" check box under the "Layout" section.[This will not show the contenteditor webpart in the page, because we using it just for javascript sake]
5.Click on the "Ok" button and press exit edit mode link.
6.This should display the popup box mentioning the URL of the page.
Calling a javascript function while loading default.aspx
There are different techniques available to call a javascript function in a sharepoint page. Following is one of the feasible solution. The idea is to include the external javascript file reference in the master page of the site and include it in the onload event of the BODY tag. Just follow the below simple steps to do this - may be only for beginners ;).
1.Create a Javascript file named myScript.js.
2.Add a simple javascript function like this.
function myFunction()
{
alert("alert from myFunction.");
}
3.Place the file into C:\Program Files\Common Files\Microsoft Shared\web server extensions\12\TEMPLATE\LAYOUTS folder.
4.Open the site where you need to call the function.
5.Activate the "Office SharePoint Server Publishing" feature to enable selecting masterpage. By going to "SiteSettings-->Site features" option under the "Site Administration" section. Click on the "Activate" button besides the "Office SharePoint Server Publishing" feature.
[if you get the error "One or more features must be turned on before this feature can be activated." you need to activate the "Office SharePoint Server Publishing Infrastructure" in site collection level]
6.Go to site settings and click on the "Master pages and page layouts" link under the Galleries section.
7.Select default.aspx and click on the "Edit in Microsoft SharePoint Designer" link from the context menu.
8.Click on File-->SaveUs from SharePoint Designer and save the default.master as TestJavaScript.master
9.Do some changes to differentiate this file from default.master (eg: removing the welcome links or applying different .css classes)
10.Find the body tag of the master page, it should look something similar to (i am including the "_" with the HTML tags to avoid the blogger interpreting it as HTML)
<_body scroll="yes" onload="javascript:if (typeof(_spBodyOnLoadWrapper) != 'undefined') _spBodyOnLoadWrapper();">
11.Add a reference to our new javascript file just above the BODY tag.
<_script type="text/javascript" src="_layouts/myScript.js"> <_script>
12.Now...just add our function name to the onload event like this and save the file.
<_body scroll="yes" onload="javascript:if (typeof(_spBodyOnLoadWrapper) != 'undefined') _spBodyOnLoadWrapper();myFunction();">
13.Right click the "TestJavaScript1.master" from the left navigator(Folder List) and click on "Check in". Choose the "Publish a major version" option and click Ok button.
14.Click on Yes in the approval dialog box. Master page gallery will open. Select the TestJavaScript file and click on Approve/reject from the context menu. Select "Approve" option and click on OK button.
15.Its almost done. Now we just need to select the "TestJavaScript.master". Go to "SiteSettings-->MasterPage" option under the "Look and Feel" section and select the "TestJavaScript.master" from Site MasterPage and SystemMasterPage sections.
16.Go to the homepage of the site you should be getting the popup message "alert from myFunction."
Adding a logo in a SharePoint Workflow email response
SharePoint designer's email body editor will have the ability to support the emails with HTML format. So if we want to display a logo in a email message we can just use a simple HTML image tag .
Also, makesure that the logo should be accessible anonymously by all the receivers of the email. If not, it will be prompting for the credentials once they open the email messages.
Also, makesure that the logo should be accessible anonymously by all the receivers of the email. If not, it will be prompting for the credentials once they open the email messages.
Subscribe to:
Posts (Atom)

_526_525.jpg)
